3D Box Shot Pro User Guide
What’s new in 3D Box Shot Pro V4?
3D Box Shot Pro V4 is a major version update to the program. The new features include:
Multiple Model Support
You can load up to 128 models into a scene in the 3D Box Shot Pro. These can all be manipulated and positioned independently. The models can be textured and have independent environment and bump maps applied. The 128 models can be a mixture internal models (the ones that ship with the program), external .3ds files, .md2 files or images loaded into the program so they can be manipulated in 3D. This functionally makes it a simple process to combine internal and external models to create diverse scenes of infinite varierty.
Collision Detection Between Models
As 128 models in scene can be difficult to mange, 3D Box Shot Pro V4 also features collision detection between models. When collision detection is active (it is possible to switch the feature off using a check box on the position tab) models cannot overlap each others bounding box (you can see a models bounding box in the program when you left click on it). With Collision detection active you can use 3D Box Shot Pro to stack models.
Stacking in 3D Box Shot Pro V4.
Stacking is a big new feature in 3D Box Shot Pro V4. As the program now supports up to 128 models per scene, we felt it was necessary to allow the models to be stacked in order to generate complex scenes.
Merge Saved Scenes
It is now possible to merge save scenes using the "Load Models Only" function on the presets menu.
Copy and Pasting Models
You can now copy and paste models in 3D Box Shot Pro V4. Once a model is selected with a left click, simply right click on any model in a scene and select “Copy”. Right click again and select paste and the copy of the model will be pasted into the scene. This allows you to quickly and easily create complex scenes featuring multiple models.
New improve Rendering Engine
The rendering engine in 3D Box Shot Pro V4 has been extensively optimised for speed. You can now export very high resoultion images (up to 67 mega pixels) in a few seconds. Smaller images are rendered virtually instantly.
New optimised model loading system
The model loading system has also been intensively optimised. It now loads all models much faster. This improvement particularily noticable when loading external .3ds files that have a high polygon count.
Changes to the 3D Box Shot Pro V4 GUI
Give the volume of new features in 3D Box Shot Pro V4, the GUI remains relatively unchanged with only the addition of the Misc Section on the Position controls Tab that contains the Toggle Control of Collision detection and the "Put to Floor" button. The Presets Menu has had a additional item added "Import Models Only".
Model Bounding Box
When you click on a model in a scene in 3D Box Shot Pro, it will be highlighted with a rectangular bounding box. Once a model is highlighted with a bounding box, you can manipulate this model independently from other models in the scene. Clicking on individual model faces will still activated the “clicker picker” system allowing you to load a texture onto a specific model face. In the image below you can see that the iPhone model is selected:

Adding Models
You can easily add additional models to the scene using the “Load Model” and “Load External File” buttons on the model tab. Select a model from the scrolling list by left clicking on it so it highlights in blue, then click the “Load Model” button.

You can apply tiny adjustments to the position of the model by selecting a pan slider then using the cursor keys to adjust the slider. This allows for more precise control compared to dragging the slider itself.
IMPORTANT: You can use the left and right mouse buttons to rotate and pan the camera view on the scene. This can be very useful when you are positioning models in scene, as seeing the scene from different angles allows you to more accurately gauge the position of models in the 3d scene.
Deleting Models
Click on a model in the scene so that it is highlighted with a rectangular bounding box. Then click the “Delete Model Button”. The model will be deleted from the scene:

As you can see, with the TV model selected (it is highlighted by a bounding box) selecting "Delete Model" removes it from the scene:

Moving Models
Click on a model in the scene in order to select it. The currently selected model will have a rectangular bounding box drawn around it. You can use the slider controls to translate (pan and zoom) the model on the Position tab. You can translate the model on the X, Y and Z axis. If the camera is facing the front of the scene then the dragging the Translate X slider left and right will move the selected model left and right. Dragging the Translate Y slider will move the model up and down. Dragging the Translate Z slider will move the model backwards and forwards (zoom in and out).
Rotating Models
Selected models can also be rotated independently of other models in the scene. With the selected model highlighted with a rectangular bounding box, drag the Rotate X, Y and Z sliders on the Position Tab to rotate the model on the X, Y and Z axis.
IMPORTANT: When you use a slider control on the model tab, you can see that it is selected as a dotted line is drawn around the slider. In technical terms this means that that slider has “focus”. When a slider has “focus” in Windows, you can use the cursor keys to move the slider. This allows you have more precise control over the slider when using the X, Y and Z Translation controls. Also when you click on the slider, the slider will jump to the position that you click on. As result, you should try to click on slider bar itself if you want to apply a small adjustment.
Scaling Models
If you are using multiple models in a scene then scale is important. The scale functions on the Position tab allow you to make individual models bigger and smaller as required. For example when creating the scene below, the external headphones model needed to be scaled down to the same size as hardback books.

What is 3D Box Shot Pro?
3D Box Shot Pro is a cover design application that can turn flat, 2D images into stunning 3D virtual covers for use on the web, in print or as application icons. It features a diverse range of models and some stunning pixel shader effects. 3D Box Shot Pro V4 also support up to 128 models per scene. These can be a mixture of internal models, external models or images loaded as external models.
Who uses 3D Box Shot Pro?
3D Box Shot Pro is used by a diverse range of individuals and professionals in a wide range of environments. These range from Independent Software Vendors that use 3D Box Shot Pro to create superb quality “box shots” and icons for their products to trans-national companies that use 3D Box Shot Pro to create print quality images for use in promotional campaigns. The program is increasingly being used by graphic designers, who use the program as a simple and easy way of adding 3D images to their designs without having to confront the near vertical learning curves of dedicated 3D Programs like Cinema 4D, 3D Studio Max or Blender.
3D Box Shot Pro is used by eBay power sellers to make stunning graphics that help them to outsell their competitors. It’s also used by many online e-commerce businesses to create virtual packaging for products they sell online. 3D Box Shot Pro is also used by retailers to create compelling point of sale (POS) marketing materials.
As 3D Box Shot Pro has the ability to export transparent .PNG files it's frequently used to provide graphics for digital signage.
Please note, the current version of 3D Box Shot Pro does not include any image design tools. It is assumed that you already have the necessary software and skill set to create your own 2D cover images. These can then be loaded into 3D Box Shot Pro and transformed into stunning print quality images or razor sharp low resolution images for use on the web or as icons.
However, the full version of 3D Box Shot Pro does include a series of design templates that you can use with Adobe photo shop, or the popular online image editing tool http://www.pixlr.com/editor. Design tutorial videos are available to 3D Box Shot Pro customers on our web site.
What’s special about 3D Box Shot Pro?
3D Box Shot Pro has several exceptionally powerful features that are worth looking at in some detail:
1. Hardware Accelerated OpenGL Graphics and Pixel Shaders
3D Box Shot Pro harnesses the power of the GPU (Graphics Processing Unit) in your PC to produce stunning results. Hardware accelerated pixel shaders produce amazing real-time reflections, shadows, depth mapping and environment mapping effects.
2. 3DS Model Loading
3D Box Shot Pro can load 3D models made in the popular 3D Modeling Package 3D Studio Max as long as they are exported in .3DS Format. The 3D models that we supply with 3D Box Shot Pro are of exceptionally high quality and display an eye popping level of detail.
Please note the 3D Box Shot EULA specifically prohibits the re-distribution of the 3D Models that ship with the program. This does not mean that you cannot distribute images that you create in 3D Box Shot Pro. It means that you cannot redistribute the 3D models that are bundled with the program. There are literally hundreds of thousands of free .3ds models available online. Many of these are directly compatible with 3D Box Shot Pro. A very good starting point is http://archive3d.net/ which has over 35,000 .3ds model freely available for download.
3D Box Shot Pro can also load .MD2 Format models.
3. Hardware Accelerated Anti-aliasing
3D Box Shot Pro exports exceptionally high quality images using a custom shader based anti-aliasing algorithm. The rendering shader in 3D Box Shot Pro samples 64 pixels to produce 1 pixel in the final image. The resulting image is often better than the maximum quality setting available on the graphics card.
4. Clicker Picker Interface
The Clicker Picker Interface in 3D Box Shot Pro makes it a breeze to select images to load on your virtual packaging. Simply click the face of the model you want to load an image onto. When you do this it will highlight in Red:

You can then select the surface tab and load in your image onto the selected face using the Base Texture “Load” button. Please note, if a texture is already loaded on a face of the model you’ll need to select the “Unload” button to remove the existing texture first.
5. Realistic Transparency
3D Box Shot Pro takes virtual packaging to the next level. 3D Box Shot renders transparent elements of 3D models realistically.
6. Print Quality Image Output Resolutions
3D Box Shot Pro can export extremely high resolution print quality output on nearly all computers including low specification laptops and net books. This makes 3D Box Shot Pro the ideal choice for graphic designers that have a requirement to include 3D virtual packaging in designs for print or the web.
7. Multiple Model Support
3D Box Shot Pro V4 supports up to 128 models per scene. These can be any type of model that the program supports, both internal and external or images loaded as external models.
The 3D Box Shot Pro GUI (Graphical User Interface)
3D Box Shot Pro uses a simple tabbed interface. We designed 3D Box Shot Pro so that it would be simple and intuitive to use. However, the following section of the manual covers each element of the control system in 3D Box Shot Pro in some detail.
The 3D Box Shot View port
The 3D Box Shot Pro view port provides a real time preview of the scene. The quality of the display in the view port is dependant on the display capabilities of the graphic card on your computer. However, the image export capabilities of 3D Box Shot Pro are not hardware dependant, and as result all machines capable of running the program will be able to export exceptional high quality images. If you are running the software version of 3D Box Shot Pro then the image quality that appears in the view port will be of low quality when compared to the hardware accelerated version of the program. However, the quality of the rendered output from the software version is identical to the hardware version.
Interacting with the View Port
Hold the left mouse down and move the mouse on the view port window in order to rotate the scene on the X and Y axis.:

Hold down the right mouse button and move the mouse to pan around the scene:

Model Tab
The model tab is where you can load multiple 3D Models into 3D Box Shot Pro. The program ships with a number of preset models of DVD cases and a wide variety of Software Boxes including the ever popular Vista / Windows 7 style box. For eBook cover designers 3D Box Shot Pro includes eBook Covers as well as iPhone Models, a TV monitor and a drinks can. Other model types will be added in later releases of the program. However, as the program is able to import external .3ds models, most requirement can be satisfied by searching for the model you need online.
You can select any of the internal models by scrolling up and down. Simply click on the model you want to load. It will then highlight in blue. Click on the "Load Model" button to load the models in. The model textures in 3D Box Shot Pro are optimized to work with the program and load quickly and many of the default textures have recommended print size information on them. To get the best out of 3D Box Shot Pro, use textures of at least these resolutions.

Load External File
3D Box Shot Pro can also load external files. The definition of an external file in this context is any .3DS file. .3DS is a very popular 3D image format. 3D Box Shot can load and display many .3DS files. However, as 3D Box Shot Pro cannot anticipate what sort of model you are loading external models can behave in unpredictable way. The Clicker Picker functions on 3D Box Shot Pro works on the basis that the 3DS model have defined materials and textures applied to its surface. If you load in an external file you may find that you cannot texture individual elements of the model. Conversely, if you find that you can texture individual surface of an external .3DS file, then it may require a lot of work and experimentation to create textures that map correctly to the model. Having said this, many of the .3ds files available on the 3D Archive (which is an online archive of over 35,000 .3ds models) work seamlessly with 3D Box Shot Pro V4.
Images in Perspective
The Load external file button will also happily load in Jpeg, jpg, BMP and PNG files. Once these are loaded into 3D Box Shot Pro, they are used to texture a 3D quad with the correct aspect ratio of the loaded image. What this means in simple terms is that you can use the program to manipulate an image in 3D. Here's a quick example of what an image looks like when it's loaded into 3D Box Shot Pro using the Load External File button:

The image is rendered to an automatically generated 3D rectangle of the exact proportions of the image. As a result you can control and manipulate the image in the same way as any other model in 3D Box Shot Pro. You can even apply environment and bump mapping to images that you load in! As of 3D Box Shot Pro V4, you can load up to 128 images or models into the program.
Preset Models in 3D Box Shot Pro
The following preset ship with the current version of 3D Box Shot Pro. We will inevitably add more models to the list of presets that ship with the program as we release new versions.
DVD Models:

Software Box Models

Other Models

Background Tab
The background tab lets you change the background and reflection settings in 3D Box Shot Pro.
Reflection Options
The reflections options in 3D Box Shot Pro are active by default. The reflections create the impression that the 3D model is standing on a reflective surface.
Reflections can be Enabled / Disabled
Simply de-check the reflections enabled box to disable the reflections. Check the box to re-enable the reflections.
Reflections Enabled
Reflections Disabled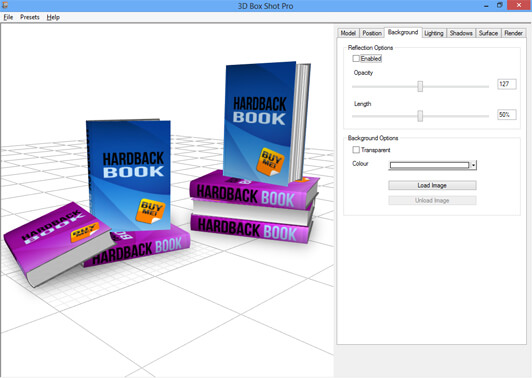
Opacity
You can adjust the opacity of the reflections to make them more or less transparent. Simply drag the slider control from left to right. The effects of the adjustments you make will be immediately apparent in the view port.

Length
You can adjust the length of the reflections using the reflection length slider. Simply drag the slider from left to right to modify the reflection length.

Background Options
3D Box Shot Pro supports three separate types of backgrounds: Transparent, Color and Image.
Transparent Background
Place a check in the “Transparent” box to make the background transparent. 3D Box Shot pro will then display a gray scale “checker board” pattern in the background. When you export an image from program the background will be transparent. Images with transparent background are idea for design use since they can be placed in a layer in an image editing program and will composite seamlessly into a design with reflections and shadows.

Colour
Use the co lour palette control to select a background colour. Select "More Colors" if you want to pick a different color or to apply RGB or HSL value for an exact color match.

Load Image
3D Box Shot features a very simple background image loading function. Simply click on the Load Image button then browse for a .jpeg, .png, or .bmp file. This will then load the image in and display it as a background image behind the scene. It can be useful to take a note of the image size you are loading in, as this will allow you to render the scene at this size in order to create a pixel perfect background image.

Unload Image
If you decide that you want to remove the background image or need to replace it with a different background image click the “Unload Image Button”. This will remove the Background image from the scene. The “Load Image” Button will now be selectable once again (it is “grayed out” once an image is loaded). You can now load a new background image into the program.
Using Images Exported from 3D Box Shot Pro, as background images:

This is a really simple technique that creates quite sophisticated results. Simply use a smaller image generate in 3D Box Shot Pro as a background image to create a composite image. The background image will then appear slightly out of focus adding to the realism of the image.
Camera Controls
The camera controls in 3D Box Shot Pro let you adjust the camera in order create exactly the scene you need.
Distance
The distance slider lets you zoom in and out of the scene. Drag the slider to the left to move the camera closer to the 3D Models. Move it to the right to move the camera further away.
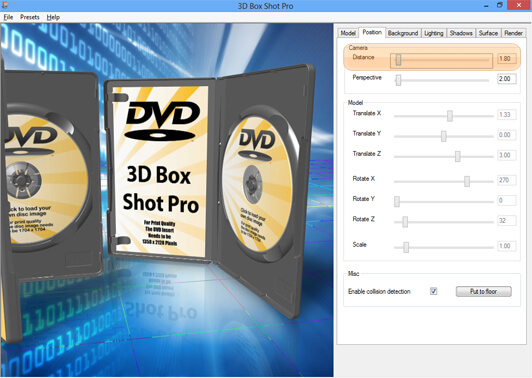
Perspective
You can alter the perspective of the scene using the perspective slider. Generally speaking, the perspective looks more natural when the slider is dragged near to, but not completely to the left.

If you drag the perspective slider to the far right you'll get something like this:

Rotate X
You can drag the slider to the left and right to rotate the currently selected model X Axis The currently selected model will have a bounding box drawn around it:

Rotate Y
You can drag the slider to the left and right to rotate the currently selected model on the Y Axis.

Rotate Z
You can drag the slider to the left and right to rotate the currently selected model on the Z Axis.

Please note, when you rotate the model (any model, including external models you load into the program) 3D Box Shot Pro will dynamically calculate the lowest point of the model and use this as the rotational axis. Give it a try, it's kind of fun!
Moving Models around the scene.
IMPORTANT: As of 3D Box Shot Pro V4, models will no longer overlap each other when you load additional models into a scene. The models with either be stack in front of the previous model or on top of the previous model, depending on the aspect ratio of the model you load into the program. If you turn of Enable collision detection you will see the following effect when you load additional models into a scene:

Fortunately, you can easily move the model you have loaded by clicking on it so that it highlights with a rectangular bounding box. You can then use the translate controls on the Position Tab to move the new model away from the space occupied by the original model. You can repeat this process as you add additional models to the scene.
You can apply tiny adjustments to the position of the model by selecting a pan slider then using the cursor keys to adjust the slider. This allows for more precise control compared to dragging the slider itself.
Translate X
Drag the Translate X slider left and right to move the selected model left and right:

Translate Y
Drag the Translate Y slider to the right in order to increase the height offset of the currently selected model or move it up and down. This makes the model appear to float in the air, effortlessly defying the forces of gravity.

Translate Z
Drag the Translate Z Slide left on right to move the model on the Z axis. This has the effect of moving the model towards the front or back of the scene:

Lighting Tab
The lighting tab in 3D Box Shot Pro gives you full control over the lighting of the scene.
Lighting Enabled
Lighting is Enabled by default. While you can turn the lighting off, this is not recommended, as the models that ship with 3D Box Shot Pro require lighting to display correctly.
Light Level
The Light Level controls in 3D Box Shot Pro give you precise control over Ambient, Diffuse and Specular light as well as control over the Horizontal and Vertical direction of the light source.

Light Direction
You can adjust these sliders to move the light source in the scene. The source of the light can have a dramatic impact on how the scene appears. The position of the light source does of course, also govern how the shadows in a scene display. With a little practice it’s possible to quickly tweak the lighting of a scene to achieve the best possible effect.
Horizontal
Use the horizontal slider to move the light source horizontally across the scene.
Vertical
Use the vertical slider to move the light source vertically.

Shadows Tab
3D Box Shot Pro features a very powerful real-time shadow casting system. This uses hardware accelerated OpenGL Shaders to create authentic looking defuse shadows that interact dynamically with the lighting system.
Shadows Enabled
While shadow effects are great and are enabled by default, you may not always want to use them in your scene. Simply de-check the “Shadows Enabled” box to disable the shadows.

Shadows Disabled
Shadow Options
The Shadow Options provide a fine level of control over the appearance of the shadows in 3D Box Shot Pro.
Opacity
Adjust the Opacity of the the shadows using this slider. Drag it to the far left to make the shadows completely transparent, or drag the slider towards the right to make the shadows progressively less translucent.
Blur
Drag the slider to the left to decrease the level of blur. Drag it to the right to increase the blur on the shadows. Shadows work best with at least some blur applied as the shadows may appear slightly pixilated if no blur is applied.
Length
The Length slider controls the length of the shadows. Drag the slider to left to make the shadows shorter. Drag the slider to the right to make the shadows longer.
Color
The colors control lets you select the colors of the shadows.

Surface Tab
The surface tab is used to load images into 3D Box Shot Pro and is used in conjunction with the Clicker Picker system. It is important to note that none of the controls on the surface tab with have any effect unless a face is selected. Fortunately the Clicker Picker system is very easy to use. A single left click on a specific model face on the view port is all that is required in order to enable to surface tab controls. Once a specific face has been selected on a given model, you can then modify the Material Settings of that face and load a texture, apply environment mapping or load a depth map.
Surface Reflectivity
3D Box Shot Pro gives you full control over the material settings of a given face on the model. The following material parameters can be easily modified. A good example of this would be changing the material color of the DVD case to green in order to produce an Xbox 360 style green DVD case.

Unload Texture
Click the “Unload” texture button to remove the current Texture from the currently selected face.
Load Texture
Click the “Load Texture” button to load an image onto the currently selected face (just click on the face to pick it). Selected faces will be outlined in red.

Environment Texture
Click on any model face so it highlights in Red. Then drag the Environment Texture slider to right right in order to increase the Opacity of the environment mapping effect. This will apply an environment map to the texture, giving it a shiny appearance. This is good for mimicking the appearance of shiny plastic or metal. Sometimes less is more with this effect.

Load Environment Texture
You can load your own environment texture into 3D Box Shot Pro. Here is an example of the sort of image you will need:

By using different environment textures you can significantly change the appearance of the the environment mapping effect in 3D Box Shot Pro.
Depth Texture
You can assign a depth texture to every model face in 3D Box Shot Pro. In the example below we simply load the disc texture in as the depth texture. 3D Box Shot Pro then automatically calculates the depth mapping using the data in the image.

The depth mapping works by using a grayscale to calculate depth and height of the the texture. The RGB values of 127,127,127 are treated as ground level. Darker than this is treated as a lower depth. Brighter than this is treated as higher in the depth map. Using this technique you can easily add stunning embossing and de-bossing to your designs. Please note, often you can simply load the base texture as a depth map and 3D Box Shot Pro will work out the rest, often giving very good results.
Use the Unload and Load button to change depth texture.
Render Tab
The render tab is where the magic happens in 3D Box Shot Pro. This is where you can select the size of the image you want to export.
Simply drag the Width and Height sliders until you have the image size you require. Please note, very high resolution images are only really ever required for print purposes. For example for an A3 print you would need to see the width slider to 3508 and the height slider to 4961. A typical thumbnail for a web site would normally need to be no bigger than 300 x 300.
It’s worth noting that we’ve placed an arbitrary limit on the maximum export size from 3D Box Shot Pro. This is simply because PC’s with limited ram will struggle to display images more than 67 mega pixels. The rendering engine is capable of generating any size image. If you need images bigger the 8192 x 8192 please contact us, as we’d love to know why!

Render button
Press the Render button and 3D Box Shot Pro will ask you where you would like to save the final rendered file. 3D Box Shot Pro exports images in the PNG format. This is primarily because the PNG format supports alpha transparency and is a lossless format. PNG is now widely regarded as the de facto standard for web images.

The progress indicator below the Render button will fill as the render job completes. The rendering engine in 3D Box Shot Pro is blisteringly fast when running the hardware accerlated version of the program. You can export 8192 x 8192 images in seconds. Lower resolution renders are completed virtually instantly. In a world where time is money 3D Box Shot Pro V4 can save you both.
However, on the software version, rendering does take longer and 3D Box Shot Pro may show "not responding" while rendering. However, leave it to run while you have a cup of coffee and it *will* complete the rendering job eventually. Even running in software 3D Box Shot Pro is far faster at rendering than other 3D programs.
Loading and Saving Scene Presets
Select presets on the File Menu:
Loading and saving of complete scenes is now fully supported in 3D Box Shot Pro V4. The new .xml save system stores paths to the models you use in a scene as well as the textures assigned to individual model faces. Environment and bump maps are saved as is all positional and lighting information.
However, there may be some occasions when you only need to load in the camera and lighting information from a previously saved scene. You can do this using the "Load Scene (basic)" option from the Presets menu.
Resetting a scene
Reset Scene (basic)
This resets the camera and lighting to default values without removing the models or their positional date from the scene.
Reset Scene (with models)
This resets the entire scene, wiping the slate clean and starting from scratch.

Import Only Models
This is a feature introduced in 3D Box Shot Pro V4 that is tremendoulsy useful as it does exactly what is says. If you have previously saved a scene, you can use this button to Imort Only the Models and postional data (plus textures and material values) without reseting the existing scene. Putting it simply you can merge scenes. This can be very useful.
----------------------------------------------------------------------------------------------------------------------------
About 3D Box Shot Pro
The about box in 3D Box Shot Pro is still currently rather minimalist:

It gives you some information on what version of 3D Box Shot Pro you are running and provides you with a quick link to www.3d-box-shot.com.
3D Box Shot Pro Hardware and Software Version
3D Box Shot Pro comes in two flavors: hardware and software. The hardware version of 3D Box Shot Pro uses the graphics hardware installed on your pc to accelerate the 3D graphics the program generate, providing a smoother experience. However, as 3D Box Shot Pro uses OpenGL, the way the hardware version runs on your PC is entirely dependant on the type of graphics card you have and the graphics driver you have installed. If you have an old graphics card or an out of date graphics driver then the hardware version of 3D Box Shot Pro may not run on your machine, or may behave strangely.
The software version of 3D Box Shot Pro will run on any Windows PC, or in a virtual machine running Windows on Linux or Mac or even over RDP. If you have problems running the hardware version then the software version of 3D Box Shot Pro will run on your PC without issues. However, the software version runs significantly slower than the hardware version. This affects both the speed of the real time scene display and the amount of time that 3D Box Shot Pro takes to render a scene. However, the quality of the output from the software version is identical in every respect to the hardware version. Ultimately, it is the quality of the final results that matter most, not the hardware that you haven used!
Running 3D Box Shot Pro from a USB stick
 As 3D Box Shot Pro doesn't’t use any DRM you can run it from a USB stick. The easiest way to set this up is to install 3D Box Shot Pro onto a memory stick that you can take with you wherever you go. In order to guarantee that 3D Box Shot Pro will run on any PC, we'd recommend that you use the Software Version of the program if you intend to do this.
In order to do this you will need a USB memory stick with at least 70mb of free space. Plug the stick into your PC and select this as the install location when you run the 3D Box Shot Pro installer. When you reach the “Select Destination Location” of the installer, stop and click the “Browse” button:

The following Window will appear enabling you to select the USB stick as the install destination.

Simply complete the installation. If you chose to install to USB, no Start Menu entries or desktop icons will be created. In order to run 3D Box Shot Pro from USB you will need to navigate into the 3D Box Shot Pro Software Full v4 folder and run 3D Box Shot Pro-V3-Software-Full.exe from the USB stick. Unless the PC you are using has been specifically locked down to prevent applications from running from USB, the program will now run as normal without any need to install it.
Technical Support
3D Box Shot Pro uses OpenGL graphics technologies.

Minimum System Requirements.
3D Box Shot Pro uses OpenGL 2.1. Your graphics card must support OpenGL 2.1 or greater in order to run the hardware version of the program. Fortunately this means that most computers purchased over the last five years will run the program without problems. If your graphics card does not support OpenGL 2.1, then you can use the software version of 3D Box Shot Pro. This comes with software OpenGL drivers that emulate OpenGL in software. In layman’s terms what this means is that the software version will run on any Windows installation. This include Windows running in a virtual machine or over an RDP connection.
In its current iteration, 3D Box Shot Pro will only run on Windows. If the hardware version of 3D Box Shot Pro will not start on your system, then it is possible that you do not have the correct graphics drivers installed on your system, or that the graphics drivers you are using are out of date. Frequently, updating your graphics drivers will boost the overall performance of your computer as a whole, so this is a worthwhile activity in general, not just as a mean of running 3D Box Shot Pro.
Design Templates and additional Design Assets
The full version of 3D Box Shot Pro ships with a range of templates and additional design assets that we do not supply with the demo version of the product. We do this partially to reduce the size of the demo, but also to provide an additional bonus for individuals or companies that purchase the product.
Design templates can be found in the “Templates” folder in the 3D Box Shot Pro Installation directory or on the 3D Box Shot Pro customer portal. The templates are in .PSD format and can be loaded into Adobe Photoshop, The GIMP or the popular online image editing application http://www.pixlr.com/editor.
Presets
We also ship a ranger of Model Presets with the program. This can be found in the Presets folder of the installation directory.
Demo Version Restrictions
The Demo version of 3D Box Shot Pro is fully functionally and not time limited. However, the output from the program is watermarked. A "salt and pepper" pattern is placed over the image in order to prevent the commercial use of images created in the demo. The idea is that you will get a feel for the product by using the demo. In order to generate images without watermarks, you will need to purchase a license. We’d very much like you to do this, as we have put a lot of time and effort into the software.
Full Version Bonus Material
As a thank you for purchasing the program we will email you, on request, a download link to various model packs that we have produced over the years.
3D Box Shot Pro is designed to work on all Windows PC's.
